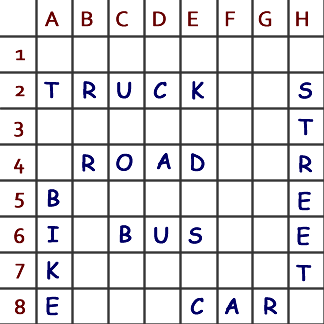
TEFL Battleships is a game played by two players. In the original version of Battleships (a game dating from World War I) a grid of squares contains some “ships” and the players must try to guess their location and then sink them (see here for more on this game).
However, this game can be adapted for use in the EFL classroom and used with words rather than ships. It is good for practicing spelling, the alphabet and also vocabulary, especially semantic fields.
Preparation
Draw out a simple grid of squares, 8 x 8 (with more advanced classes you can make the grid bigger). Along the top and left side put numbers and letters so that each square in the grid can be identified:

Next, you can prepare a list of words which the students will use to add into their grids. For an 8 x 8 grid you could have
- 1 x 6 letter word
- 1 x 5 letter word
- 2 x 4 letter words
- 2 x 3 letter words
You need to make 2 seperate lists of words (so that when the students play in pairs, they don’t have the same words on their grids). The words you choose can be completely random or you can choose words which you would like your class to practice (e.g. a particular semantic field), or perhaps – if you wish to practice the pronunciation of certain sounds or letters with your class – choose words which are spelt or sound similar.
Later on when the class are familiar with the game, you can have them create their own word list.
A finished grid might look like this:

(This grid, obviously, contains words related to transport.)
Pre-Teaching
If you have created the word lists according to pronunciation you can check with your class how to say various letter combinations in English. Also, you may need to go over the pronunciation of the alphabet with the class.
Finally you can show the class an empty grid and make sure they all understand how to identify a particular square, e.g. A3 or D5 – putting up an empty grid on the board allows you to play a quick game with the class.
Go through a game with the whole class getting them to call out grid references and you telling them if they have made a “hit” or a “miss”. If they make a “hit” then you can give them the letter and write it into the grid.
Suppose the class “hit” the letter K. From there you can have them guess letters around this and try and identify the word. Try and get the class to think about letter combinations (e.g. that K is followed by a vowel; K is often preceded by C; K can be the start or finish of a word, etc).
Eventually the class will complete the entire grid and identify all the hidden words. It’s then time to move on and allow the students to play independently.
Running the Activity
Get the class into pairs. Give each student 2 copies of an empty grid and a copy of the words they must put in the grid. Make sure they understand that this isn’t like a crossword and the words they put into the grid must not overlap or be adjacent.
While the students are adding the words to one grid (making sure their partner can’t see) go around the class and check they are filling the grid correctly.
The other grid they will use to try and recreate their opponent’s grid.
Finally get the students to play, taking it in turns to try and find the hidden letters and words.
The game continues until a student has found all the words on their opponent’s grid. When they have done this they can compare it to their opponents original and see if they have all the letters and words correct. You should also take a look at the grids and make sure that their are no mistakes; it may well be, for example, that Student 1 has said one letter which Student 2 consistently writes down as another letter.


0 Comments